

UPDATED – 30/08/2022
This article has been updated to point to my newest Github content. This has slightly improved BICEP code and allows things like AAD join and Log Analytics join etc.
I have also added a much newer version of the RD Agent to the DSC configuration.
In all my years working in Azure, I have always been drawn to automated deployment and became quite involved with JSON ARM templates.
The idea of Infrastructure as code is very interesting to me and one of the features of Azure that I really embrace. Being able to spin up a whole environment from nothing is an amazing feature.
I have dabbled in Terraform a little but never really made the jump from standard ARM templates.
Recently however a new Domain Specific Language was released by Microsoft for authoring and deploying ARM templates. This language is called Project BICEP.
I immediately found BICEP to be intriguing due to its command structure. First of all, it uses a very easy and readable syntax for its commands. It also has great VSCode extensions for integration. This makes authoring new code easy thanks to Intellisence.
It should be mentioned that BICEP is not a replacement for JSON ARM templates but rather a DSL to allow you to access the full feature set of ARM templates in a much more user-friendly and manageable way.
The main purpose of this blog is to show how to set up BICEP and show how it can be used to build an Azure Virtual Desktop Environment.
Setting up BICEP
First things first we need to install the required BICEP tooling onto your management machine. You can find the latest release here:
Run the installer. This will install the required tooling and add the settings to your PATH environment variable.
Next, as I use VSCode for all my scripting I installed the BICEP VSCode Extension
We can verify the installation has been successful by opening up PowerShell or Command Prompt and running:
bicep –version

We now should have BICEP installed and ready to use!
BICEP Structure
I am not going to go super in-depth into every function of BICEP, but rather highlight some of the important points.
BICEP can be a single bicep file or multiple.
BICEP is able to support module authoring. This means you can have a main bicep file that then references additional nested files for specific functions.
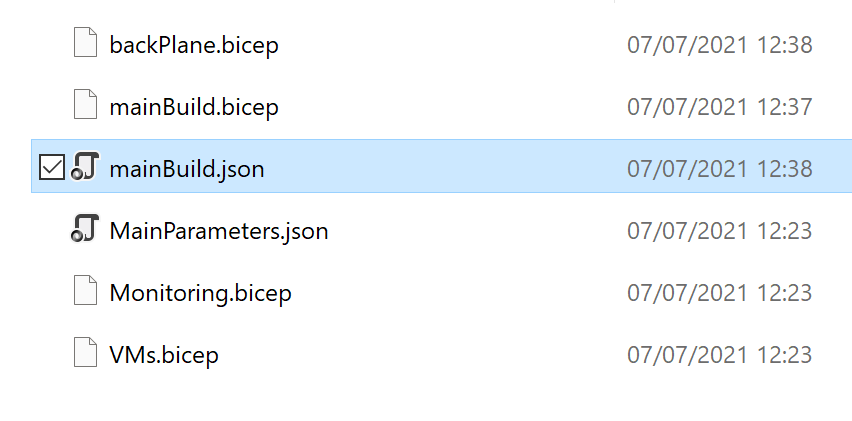
In my BICEP deployment, I have 3 such Modules. Below is the structure of the deployment script.

The MainBuild.bicep file contains the main parameters and resources required for deployment. This script then calls the nested module files like functions. This allows for easy separation of deployment into separate files where needed.
In my example, the MainBuild.bicep script deals with the Resource Group creation and then calls on the required modules to create the AVD resources, Monitoring and VMs.
Basic BICEP
BICEP files must contain any required resources or modules but can also contain parameters, variables and outputs amongst other things.
Resources
At the base level, you could make a BICEP file with a single resource.
resource stg 'Microsoft.Storage/storageAccounts@2019-06-01' = {
  name: 'companystorageaccount' // must be globally unique
  location: 'uksouth'
  kind: 'Storage'
  sku: {
    name: 'Standard_LRS'
  }
}
The above BICEP file would be perfectly fine and the end result would create an Azure Storage account named ‘companystorageaccount’ in UK South.
This is the most basic form of a BICEP file and it is much more likely you will be using parameters and variables to create your resources.
Parameters
Parameters can easily be added using
param <parametername> <parametertype>
param storageAccountName string
These parameters can then be referenced elsewhere in the script by name.
The parameter can also be used to reference the newly created resource if required for any nested resources.
This allows you to transform the previous resource as follows:
resource stg 'Microsoft.Storage/storageAccounts@2019-06-01' = {
  name: storageAccountName // must be globally unique
  location: 'uksouth'
  kind: 'Storage'
  sku: {
    name: 'Standard_LRS'
  }
}
Modules
Modules can also be used. These are pretty much another nested BICEP file. This module can have its own parameters if needed and can even call another module if required.
An example of a module in my case is as below:
module backPlane './backPlane.bicep' = {
  name: 'backPlane'
  scope: resourceGroup(AVDResourceGroup)
  params: {
    location: workspaceLocation
    workspaceLocation: workspaceLocation
    logworkspaceSub: logworkspaceSub
    logworkspaceResourceGroup: logworkspaceResourceGroup
    logworkspaceName: logworkspaceName
    hostPoolName: hostPoolName
    hostPoolFriendlyName: hostPoolFriendlyName
    hostPoolType: hostPoolType
    appGroupFriendlyName: appGroupFriendlyName
    applicationGroupReferences: applicationGroupReferences
    loadBalancerType: loadBalancerType
    workspaceName: workspaceName
    personalDesktopAssignmentType: personalDesktopAssignmentType
    customRdpProperty: customRdpProperty
    tokenExpirationTime: tokenExpirationTime
    maxSessionLimit: maxSessionLimit
    newBuild: newBuild
  }
}
In the above I have created a module called backPlane, this module is responsible for building the actual Azure Virtual Desktop services (Workspace, Host Pool, Application group). Rather than have these resources all added to the main BICEP file, they have been separated into their own module.
This allows easy management of the deployment if changes are needed.
In the Module, you will notice there is a scope parameter. This advises BICEP where this module’s resources will be scoped to. In my case, I am scoping to a specific resource group created from my script (by using the name parameter)
If your module requires any parameters you would then add them to the params section.
Dependencies
You can also add the DependsOn parameter if you need this module to have a dependency on another resource.
This can be added in the following fashion:
  dependsOn: [
    resourceGroupDeploy
  ]
This would mean the backPlane module would be dependant on the resourceGroupDeploy Resource.
The final thing to cover at this point is the targetScope parameter used BICEP to determine whether the deployment will be scoped at the subscription or resource group level. This is important as certain resources (such as Resource Groups) can only be created under the Subscription scope.
In our case, because we are creating resource groups we need to scope for subscription level.
targetScope = 'subscription'
It should be understood that BICEP is a smart language and will automatically add a dependency to resources if needed.
For example, if you create a Storage Account resource called SAAccount and then reference that in a VM resource, then BICEP will create the dependency in the VM resource automatically when the BICEP files are built.
AVD Deployment
Code
All the code for this deployment can be found on my Github. This includes all the JSON files and a Configuration file containing all the required scripts for the deployment.
The link is below:
jamesatighe/AVD-BICEP: A full Azure Virtual Desktop Deployment authored in BICEP (github.com)
Main Script
In my BICEP scripting my MainBuild.bicep file takes in all the required parameters and then calls the 4 modules in turn. Firstly, to create the required resource groups, next to create the AVD resources, then configure monitoring for AVD, finally, it deploys the VMs.
Each module has its own parameters and resources within it. This allows complete segregation of services into the different modules.
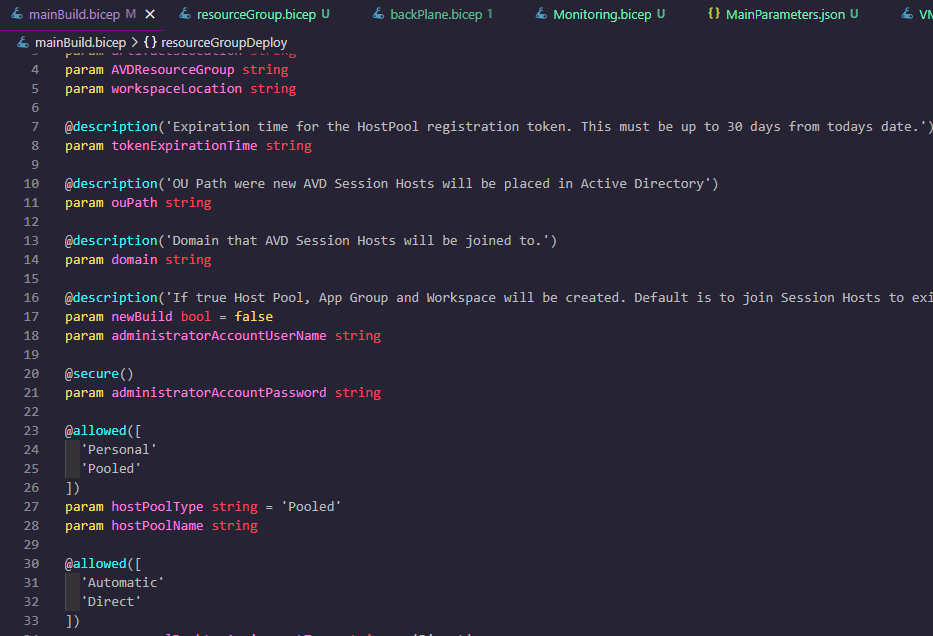
The MainBuild.bicep contains all the parameters required for all 4 modules. Most of the parameters are for the VMs module (as this has the most settings) An example of these parameters is below:
Resource Group
After declaring the many many parameters we can call the first module: ResourceGroup.
module resourceGroupDeploy 'resourceGroup.bicep' = {
  name: 'backPlane'
  params: {
    AVDResourceGroup: AVDResourceGroup
    vmResourceGroup: vmResourceGroup
  }
}
This is a simple module that’s purpose is to create the 2 Resource Groups as below:
targetScope = 'subscription'

param AVDResourceGroup string
param vmResourceGroup string

resource vmResourceGroup_resource 'Microsoft.Resources/resourceGroups@2021-01-01' = {
  name: vmResourceGroup
  location: 'uksouth'
}

resource AVDResourceGroup_resource 'Microsoft.Resources/resourceGroups@2021-01-01' = {
  name: AVDResourceGroup
  location: 'uksouth'
}
BackPlane (AVD Resources)
Once the resource groups have been created the MainBuild script will move onto the backPlane module
module backPlane './backPlane.bicep' = {
  name: 'backPlane'
  scope: resourceGroup(AVDResourceGroup)
  params: {
    location: workspaceLocation
    workspaceLocation: workspaceLocation
    logworkspaceSub: logworkspaceSub
    logworkspaceResourceGroup: logworkspaceResourceGroup
    logworkspaceName: logworkspaceName
    hostPoolName: hostPoolName
    hostPoolFriendlyName: hostPoolFriendlyName
    hostPoolType: hostPoolType
    appGroupFriendlyName: appGroupFriendlyName
    applicationGroupReferences: applicationGroupReferences
    loadBalancerType: loadBalancerType
    workspaceName: workspaceName
    personalDesktopAssignmentType: personalDesktopAssignmentType
    customRdpProperty: customRdpProperty
    tokenExpirationTime: tokenExpirationTime
    maxSessionLimit: maxSessionLimit
    newBuild: newBuild
  }
  dependsOn: [
    resourceGroupDeploy
  ]
}
We can see that there are a number of parameters set on this module. Most are self-explanatory. The logworkspacexxxxx parameters are used to configure the monitoring to link to the correct Log Analytics Workspace.
The tokenExpirationTime is used to create a new AVD Host Pool Registration Token. This token MUST be valid and valid for no longer than 30 days. If this is invalid the Session Hosts will fail to register to the Host Pool.
The newBuild parameter is a Boolean value used to determine if the deployment is completely new or an amendment to an existing deployment. If newBuild is false then the creation of the AVD resources will be skipped.
The actual script behind the backPlane module has a number of resources. Here is an example of the Host Pool resource.
resource hostPool 'Microsoft.DesktopVirtualization/hostPools@2019-12-10-preview' = if (newBuild) {
  name: hostPoolName
  location: location
  properties: {
    friendlyName: hostPoolFriendlyName
    hostPoolType: hostPoolType
    loadBalancerType: loadBalancerType
    customRdpProperty: customRdpProperty
    preferredAppGroupType: 'Desktop'
    personalDesktopAssignmentType: personalDesktopAssignmentType
    maxSessionLimit: maxSessionLimit
    validationEnvironment: false
    registrationInfo: {
      expirationTime: tokenExpirationTime
      token: null
      registrationTokenOperation: 'Update'
    }
  }
}
Monitoring
The backPlane module then calls the Monitoring module to configure the AVD Monitoring.
module Monitoring './Monitoring.bicep' = {
  name: 'Monitoring'
  params: {
    location: location
    hostpoolName: hostPoolName
    workspaceName: workspaceName
    logworkspaceSub: logworkspaceSub
    logworkspaceResourceGroup: logworkspaceResourceGroup
    logworkspaceName: logworkspaceName
  }
  dependsOn: [
    workspace
    hostPool
  ]
}
The Monitoring module configures the diagnostic settings for the AVD resources. An example of the resources is below:
resource workspaceDiagName 'Microsoft.DesktopVirtualization/workspaces/providers/diagnosticSettings@2017-05-01-preview' = {
  name: workspaceDiagName_var
  location: location
  properties: {
    workspaceId: logworkspaceId
    logs: [
      {
        category: 'Checkpoint'
        enabled: 'True'
      }
      {
        category: 'Error'
        enabled: 'True'
      }
      {
        category: 'Management'
        enabled: 'True'
      }
      {
        category: 'Feed'
        enabled: 'True'
      }
    ]
  }
}
Outputs
The backPlane module also gives an Output. This allows the calling script to access specific data obtained in the module.
output hostPoolToken string = reference(hostPool.id, '2019-12-10-preview').registrationInfo.token
output appGroupName string = appGroupName
Two outputs are created. hostPoolToken to hold the new Host Pool registration token. This is needed to pass to the VMs module to allow the Session Hosts to join the Host Pool.
The appGroupName output is also used in the VMs module.
The backPlane module finishes and the MainBuild.bicep continues.
Session Hosts
Finally, the VMs module is called.
module VMs './VMs.bicep' = {
  name: 'VMs'
  scope: resourceGroup(vmResourceGroup)
  params: {
    AzTenantID: AzTenantID
    location: vmLocation
    administratorAccountUserName: administratorAccountUserName
    administratorAccountPassword: administratorAccountPassword
    artifactsLocation: artifactsLocation
    vmDiskType: vmDiskType
    vmPrefix: vmPrefix
    vmSize: vmSize
    newBuild: newBuild
    currentInstances: currentInstances
    AVDnumberOfInstances: numberOfInstances
    existingVNETResourceGroup: existingVNETResourceGroup
    existingVNETName: existingVNETName
    existingSubnetName: existingSubnetName
    sharedImageGallerySubscription: sharedImageGallerySubscription
    sharedImageGalleryResourceGroup: sharedImageGalleryResourceGroup
    sharedImageGalleryName: sharedImageGalleryName
    sharedImageGalleryDefinitionname: sharedImageGalleryDefinitionname
    sharedImageGalleryVersionName: sharedImageGalleryVersionName
    hostPoolName: hostPoolName
    domainToJoin: domain
    ouPath: ouPath
    appGroupName: reference(extensionResourceId('/subscriptions/${subscription().subscriptionId}/resourceGroups/${AVDResourceGroup}', 'Microsoft.Resources/deployments', 'backPlane'), '2019-10-01').outputs.appGroupName.value
    appID: appID
    appSecret: appSecret
    defaultUsers: defaultUsers
    desktopName: desktopName
    resourceGroupName: AVDResourceGroup
  }
  dependsOn: [
    backPlane
  ]
}
The VM part of the build is rather involved and contains a lot of scripts and DSC resources. These will be covered in the following section.
VMs Deployment
The VMs module performs the following steps:
- Deploy Session Host VMs
- Run a custom script extension to set the default language and region to EN-GB
- Join VMs to domain
- Run DSC Scripts to rename the Default Desktop Application Group, assign users to the Application Group and register the Session Hosts to the Host Pool.
The VMs module is a very complex script. This is responsible for the main build of the AVD platform.
Deploy Session Host VMs
The VMs module allows for multiple Session Host VMs to be created. This is based on the numberOfInstances parameter.
It also takes into account the current number of instances from the currentInstances parameter to ensure the correct numbering of resources.
This is because this deployment script can be used for both new builds and amending an existing AVD deployment to add additional Session Hosts.
The script uses a loop to deploy the correct number of machines. An example of this is shown below for the Network Interface resource
resource nic 'Microsoft.Network/networkInterfaces@2020-06-01' = [for i in range(0, AVDnumberOfInstances): {
  name: '${vmPrefix}-${i + currentInstances}${networkAdapterPostfix}'
  location: location
  properties: {
    ipConfigurations: [
      {
        name: 'ipconfig'
        properties: {
          privateIPAllocationMethod: 'Dynamic'
          subnet: {
            id: subnetID
          }
        }
      }
    ]
  }
}]
The loop is quite simple and is access via the
[for i in range(0,AVDnumberOfInstances): {
         code...
    }
]
This will create the exact number of resources based on the entered instance count.
The name will be offset by the currentInstances amount to ensure the numbering continues correctly for additional Session Hosts.
The VMs module will create the VM based on a Shared Image Gallery Definition Version as shown:
resource vm 'Microsoft.Compute/virtualMachines@2020-06-01' = [for i in range(0, AVDnumberOfInstances): {
  name: '${vmPrefix}-${i + currentInstances}'
  location: location
  properties: {
    licenseType: 'Windows_Client'
    hardwareProfile: {
      vmSize: vmSize
    }
    availabilitySet: {
      id: resourceId('Microsoft.Compute/availabilitySets', '${vmPrefix}-AV')
    }
    osProfile: {
      computerName: '${vmPrefix}-${i + currentInstances}'
      adminUsername: existingDomainUserName
      adminPassword: administratorAccountPassword
    }
    storageProfile: {
      osDisk: {
        name: '${vmPrefix}-${i + currentInstances}-OS'
        managedDisk: {
          storageAccountType: vmDiskType
        }
        osType: 'Windows'
        createOption: 'FromImage'
      }
      imageReference: {
        //id: resourceId(sharedImageGalleryResourceGroup, 'Microsoft.Compute/galleries/images/versions', sharedImageGalleryName, sharedImageGalleryDefinitionname, sharedImageGalleryVersionName)
        id: '/subscriptions/${sharedImageGallerySubscription}/resourceGroups/${sharedImageGalleryResourceGroup}/providers/Microsoft.Compute/galleries/${sharedImageGalleryName}/images/${sharedImageGalleryDefinitionname}/versions/${sharedImageGalleryVersionName}'
      }
      dataDisks: []
    }
    networkProfile: {
      networkInterfaces: [
        {
          id: resourceId('Microsoft.Network/networkInterfaces', '${vmPrefix}-${i + currentInstances}${networkAdapterPostfix}')
        }
      ]
    }
  }
  dependsOn: [
    availabilitySet
    nic[i]
  ]
}]
Custom Script
It was noted during deployment that setting the default Language and Region for the Multi user Windows 10 can be a pain.
Therefore, I created a simple script that will run when the machine is created to set the default region and language for new users.
The script is located on my Public Azure Blob if anyone is interested in looking at it.
https://tighedeploy.blob.core.windows.net/dsc/languagescript.ps1
https://tighedeploy.blob.core.windows.net/dsc/UKRegion.xml
resource languagefix 'Microsoft.Compute/virtualMachines/extensions@2020-12-01' = [for i in range(0, AVDnumberOfInstances): {
  name: '${vmPrefix}-${i + currentInstances}/languagefix'
  location: location
  properties: {
    publisher: 'Microsoft.Compute'
    type: 'CustomScriptExtension'
    typeHandlerVersion: '1.10'
    autoUpgradeMinorVersion: true
    settings: {
      fileUris: [
        '${artifactsLocation}languagescript.ps1'
        '${artifactsLocation}UKRegion.xml'
      ]
    }
    protectedSettings: {
      commandToExecute: 'powershell.exe -ExecutionPolicy Bypass -File languagescript.ps1'
    }
  }
  dependsOn: [
    vm[i]
  ]
}]
Join VMs to Domain
The VMs are then joined to the domain using the JsonADDomainExtension this is pretty straightforward and just takes in the Administrator Credentials, OUPath and Domain.
resource joindomain 'Microsoft.Compute/virtualMachines/extensions@2020-12-01' = [for i in range(0, AVDnumberOfInstances): {
  name: '${vmPrefix}-${i + currentInstances}/joindomain'
  location: location
  properties: {
    publisher: 'Microsoft.Compute'
    type: 'JsonADDomainExtension'
    typeHandlerVersion: '1.3'
    autoUpgradeMinorVersion: true
    settings: {
      name: domainToJoin
      ouPath: ouPath
      user: administratorAccountUserName
      restart: 'true'
      options: '3'
      NumberOfRetries: '4'
      RetryIntervalInMilliseconds: '30000'
    }
    protectedSettings: {
      password: administratorAccountPassword
    }
  }
  dependsOn: [
    vm[i]
    languagefix[i]
  ]
}]
Desired State Configuration
The last step of the deployment is to run Desired State Configuration against the new VMs.
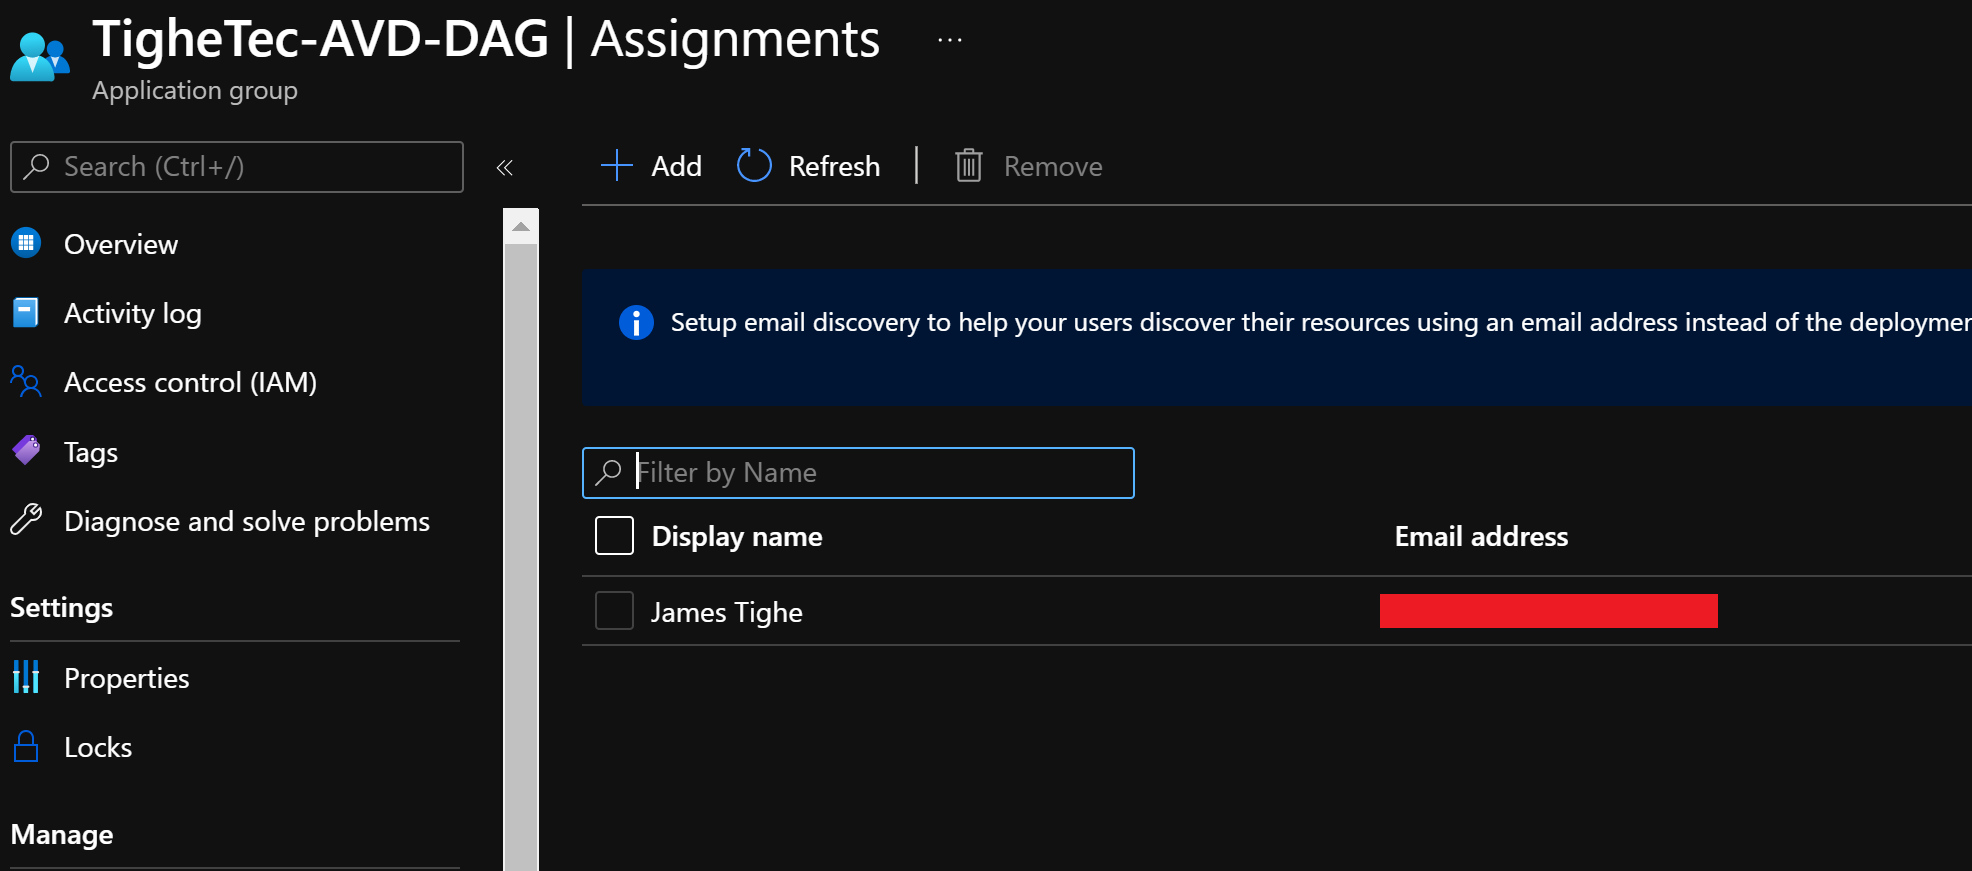
This will install the AVD Agent and register the Session Hosts to the Host Pool. It will also rename the Desktop Application Group, and assign the required users to the Application Group.
resource dscextension 'Microsoft.Compute/virtualMachines/extensions@2020-12-01' = [for i in range(0, AVDnumberOfInstances): {
  name: '${vmPrefix}-${i + currentInstances}/dscextension'
  location: location
  properties: {
    publisher: 'Microsoft.Powershell'
    type: 'DSC'
    typeHandlerVersion: '2.73'
    autoUpgradeMinorVersion: true
    settings: {
      modulesUrl: '${artifactsLocation}Configuration.zip'
      configurationFunction: 'Configuration.ps1\\AddSessionHost'
      properties: {
        HostPoolName: hostPoolName
        ResourceGroup: resourceGroupName
        ApplicationGroupName: appGroupName
        DesktopName: desktopName
        AzTenantID: AzTenantID
        AppID: appID
        AppSecret: appSecret
        DefaultUsers: defaultUsers
        vmPrefix: vmPrefix
      }
    }
  }
  dependsOn: [
    vm[i]
    joindomain[i]
  ]
}]
The configuration files are again stored on my Public Azure blob
https://tighedeploy.blob.core.windows.net/dsc/Configuration.zip
It would be recommended to take a copy of this zip and host on your own Storage Account. There is the possibility this may be updated in the future.
This zip contains 3 DSC scripts and the Deployment Agent.
The configuration called by the DSC resources is AddSessionHost
First DSC checks whether the VM is a Server host or a Windows 10 Multi-user. If Server the RDS Services are installed.
Then the configuration performs a quick check to see if the VM is the first VM in the Host Pool. If so then it runs the scripts to install the agent and register the Session Host with the Host Pool, but will also run a script to Rename the Desktop Application Group and assign the relevant users.
This is not needed when adding session hosts to a Host Pool so it will only be performed if the host pool is being rebuilt and the VM is <VMPREFIX>-0
            if ($env:computername -eq "$($vmPrefix)-0") {

                Script ExecuteRdAgentInstallClient
                {
                    GetScript = {
                        return @{'Result' = ''}
                    }
                    SetScript = {
                        & "$using:ScriptPath\Script-AddRdshServer.ps1" -HostPoolName $using:HostPoolName -ResourceGroupName $using:ResourceGroup -AzTenantID $using:AzTenantID -AppId $using:AppID -AppSecret $using:AppSecret
                        & "$using:ScriptPath\Script-RenameDesktop.ps1" -ResourceGroup $using:ResourceGroup -ApplicationGroupName $using:ApplicationGroupName -AzTenantID $using:AzTenantID -DesktopName $using:DesktopName -AppId $using:AppID -AppSecret $using:AppSecret
                        & "$using:ScriptPath\Script-AddDefaultUsers.ps1" -HostPoolName $using:HostPoolName -ResourceGroup $using:ResourceGroup -ApplicationGroupName $using:ApplicationGroupName -AzTenantID $using:AzTenantID  -AppId $using:AppID -AppSecret $using:AppSecret -DefaultUsers $using:DefaultUsers
                    }
                    TestScript = {
                        return (Test-path "Registry::HKEY_LOCAL_MACHINE\SOFTWARE\Microsoft\RDInfraAgent")
                    }
                }
            }
            else {
                Script ExecuteRdAgentInstallClient
                {
                    GetScript = {
                        return @{'Result' = ''}
                    }
                    SetScript = {
                        & "$using:ScriptPath\Script-AddRdshServer.ps1" -HostPoolName $using:HostPoolName -ResourceGroupName $using:ResourceGroup -AzTenantID $using:AzTenantID -AppId $using:AppID -AppSecret $using:AppSecret
                    }
                    TestScript = {
                        return (Test-path "Registry::HKEY_LOCAL_MACHINE\SOFTWARE\Microsoft\RDInfraAgent")
                    }
                }

            }
The Desktop Rename and User Assignment scripts need to have access to Azure to be able to run certain PowerShell commands.
Therefore, there is an AppID and AppSecret passed in as a parameter. This is an Azure Service Principal that has been created to grant the required access.
I have granted this Service Principal API permissions to be able to access Azure AD. This is required for role assignment operations.
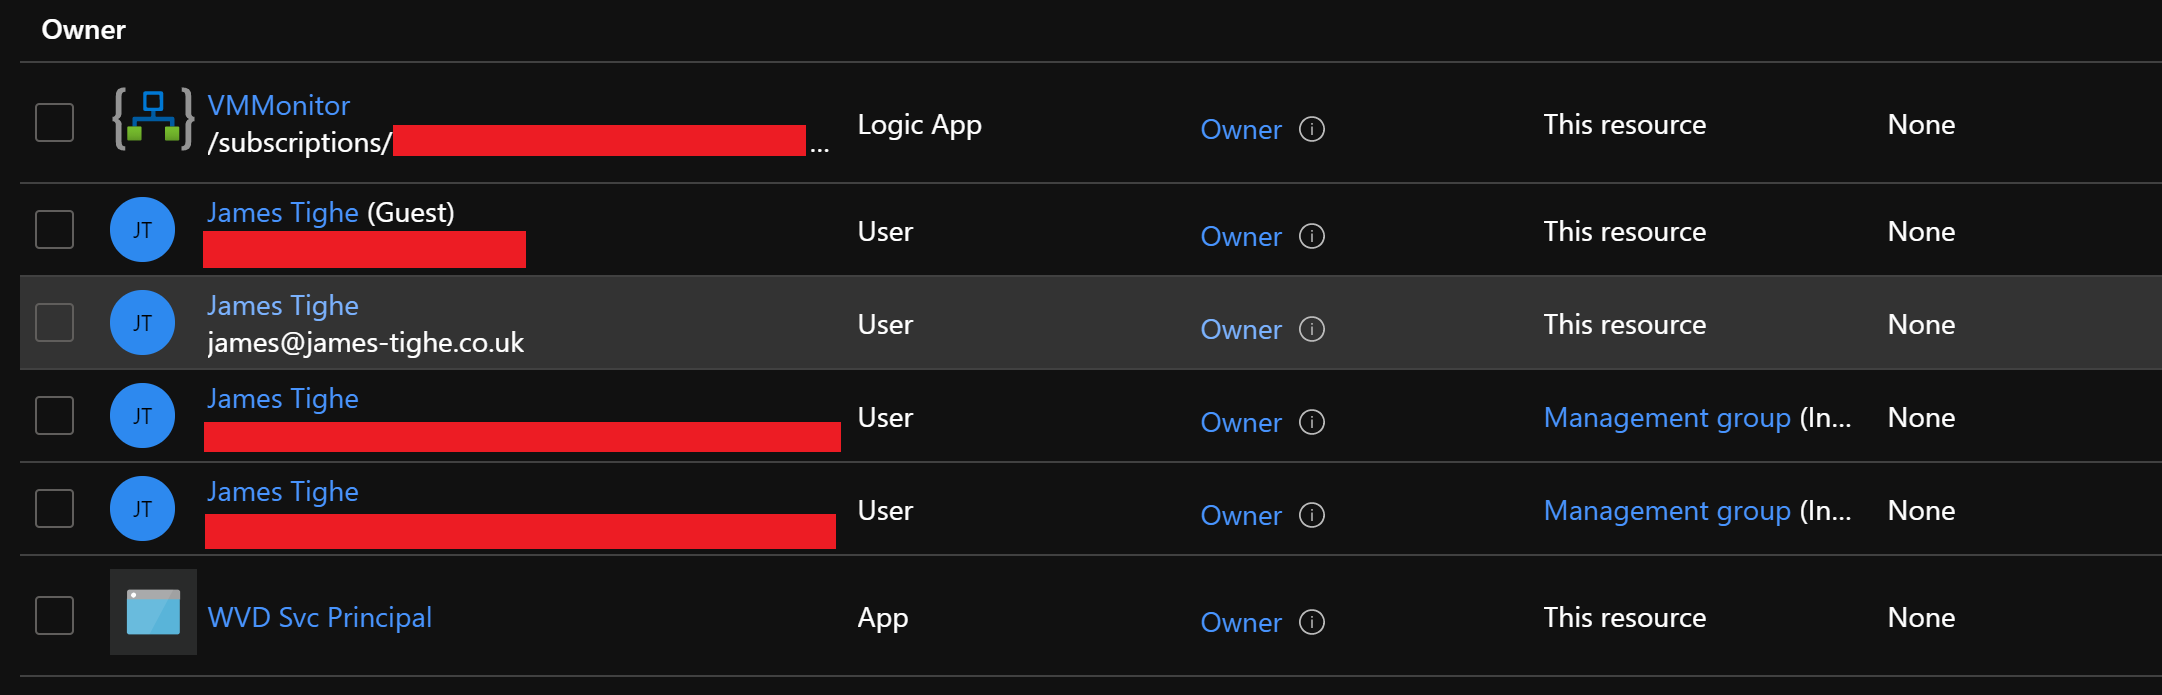
Also, this account has been granted Owner rights over the target subscription. Ideally, you would set a custom role for this but for testing adding as Owner was okay.
Rename Desktop Script
Script-RenameDesktop below needs access to run the Update-AzWVDDesktop command to change the name of the Desktop Application Group. This script uses the AppID and AppSecret to connect to Azure AD and run the required command.
#
.SYNOPSIS
Renames the existing Application Group Desktop to a friendly name.

.DESCRIPTION
This script will connect to Azure and rename the SessionHost desktop for the required Application Group to the required name.

This script requires a Service Principal for connection to Azure.
#>

param(
    [Parameter(mandatory = $true)]
    [string]$ResourceGroup,
    [Parameter(mandatory = $true)]
    [string]$ApplicationGroupName,
    [Parameter(mandatory = $true)]
    [string]$DesktopName,
    [Parameter(mandatory = $true)]
    [string]$AzTenantID,
    [Parameter(mandatory = $true)]
    [string]$AppID,
    [Parameter(mandatory = $true)]
    [string]$AppSecret
)

$ScriptPath = [system.IO.path]::GetDirectoryName($PSCommandPath)
. (Join-Path $ScriptPath "Functions.ps1")

#Install Pre-Req modules
Install-packageProvider -Name NuGet -MinimumVErsion 2.8.5.201 -force
Install-Module -Name Az.DesktopVirtualization -AllowClobber -Force
Install-Module -Name Az.Accounts -AllowClobber -Force
Import-Module -Name Az.DesktopVirtualization

Write-Log -Message "Starting Script. Renaming Desktop name."
#Create credential object to connect to Azure
$Creds= New-Object System.Management.Automation.PSCredential($AppID, (ConvertTo-SecureString $AppSecret -AsPlainText -Force))

Write-Log -Message "Connecting to Azure."
#Connect to Azure
Connect-AzAccount -ServicePrincipal -Credential $Creds -TenantID $AzTenantID

#Update the Application Group Desktop FriendlyName
Write-Log -Message "Attempting to rename Desktop name."
try {
    Update-AzWVDDesktop -ResourceGroupName $ResourceGroup -ApplicationGroupName $ApplicationGroupName -Name $DesktopName -FriendlyName $DesktopName -ErrorAction Stop
    Write-Log -Message "Successfully renamed Desktop."

} catch {
    Write-Log -Error "Failed to rename Desktop"
    Write-Log -Error "Error Details: $_"
}
Default User Script
Script-AddDefaultUsers uses Azure AD permissions to assign the relevant Azure AD role assignments to grant access to the Desktop Application Group for the required users.
This assigns the Desktop Virtualization User role scoped to the AVD Application group resource.
<#
.SYNOPSIS
Adds the required User Assignment to the Application Group.

.DESCRIPTION
This script will connect to Azure and assign the main WVD access group to have access to the WVD environment.

This script requires a Service Principal for connection to Azure.
#>
param
(
    [Parameter(mandatory = $true)]
    [string]$ResourceGroup,
    [Parameter(mandatory = $true)]
    [string]$ApplicationGroupName,
    [Parameter(Mandatory = $true)]
    [string]$AzTenantID,
    [Parameter(Mandatory = $true)]
    [string]$HostPoolName,
    [Parameter(mandatory = $true)]
    [string]$AppID,
    [Parameter(mandatory = $true)]
    [string]$AppSecret,
    [Parameter(mandatory = $false)]
    [string]$DefaultUsers
)

$ScriptPath = [system.IO.path]::GetDirectoryName($PSCommandPath)
. (Join-Path $ScriptPath "Functions.ps1")

$ErrorActionPreference = "Stop"

Write-Log -Message "Starting Script. Adding Application Group Users"

#Install Pre-Req modules
Install-packageProvider -Name NuGet -MinimumVErsion 2.8.5.201 -force
Install-Module -Name Az.DesktopVirtualization -AllowClobber -Force
Install-Module -Name Az.Accounts -AllowClobber -Force
Install-Module -Name Az.Resources -AllowClobber -Force
Import-Module -Name Az.DesktopVirtualization

#Create credential object to connect to Azure
$Creds= New-Object System.Management.Automation.PSCredential($AppID, (ConvertTo-SecureString $AppSecret -AsPlainText -Force))

Connect-AzAccount -ServicePrincipal -Credential $Creds -TenantID $AzTenantID

Write-Log -Message "Checking that Host Pool does not already exist in Tenant"
$HostPool = Get-AzWVDHostPool
if (!$HostPool.name -contains $HostPoolName)
{
    Write-Log -Error "Host Pool does not exist"
    throw "Host Pool: $HostPoolName does not exist"
}

Write-Log -Message "Host Pool: $HostPoolName exists"

[array]$cloud = @()
[array]$users = @()
if ($defaultUsers) {
    $userlist = $DefaultUsers.Split(",")


    foreach ($user in $userlist)
    {
        if ($user -match "@") {
            $users += $user
        } else {
            $cloud += $user
        }

    }

    if($cloud.count -gt 0) {
        Write-Log -Message "Adding Cloud Groups"
        foreach ($clouduser in $cloud)
        {
            try {
                Write-Log -Message "Adding user/group: $clouduser to App Group $ApplicationGroupName"
                New-AzRoleAssignment -ObjectId "$($clouduser)" -RoleDefinitionName "Desktop Virtualization User" -ResourceName $ApplicationGroupName -ResourceGroupName $ResourceGroup -ResourceType 'Microsoft.DesktopVirtualization/applicationGroups' -ErrorAction Stop
            } catch {
                Write-Log -Error "Error adding user/group: $clouduser to App Group: $ApplicationGroupName"
                Write-Log -Error "Error Details: $_"
            }
        }
    }
    if ($users.count -gt 0) {
        Write-Log -Message "Adding On-Premise Users/Groups"
        foreach ($premUser in $users)
        {
            try {
                Write-Log -Message "User: $premuser"
                New-AzRoleAssignment -UserPrincipalName "$premUser" -RoleDefinitionName "Desktop Virtualization User" -ResourceName $ApplicationGroupName -ResourceGroupName $ResourceGroup -ResourceType 'Microsoft.DesktopVirtualization/applicationGroups' -ErrorAction Stop
                Write-Log -Message "Default User Group successfully added to App Group: $ApplicationGroupName"
            } catch {
                Write-Log -Error "Error adding user: $premUser to App Group: $ApplicationGroupName"
                Write-Log -Error "Error details: $_"
            }
        }
    }
}
The script requires users in a CSV formatted list. These can be either UPNs for user accounts. Or the Azure AD Object ID of a group. These can be combined and the script will add as needed.
Add Session Host
The main script performs the joining of the Session Host to the AVD Host Pool. This is done by extracting the AVDAgent installer and then running the installers and referencing the Host Pool Registration Token obtained from the backPlane module.
<#

.SYNOPSIS
Creating Hostpool and add sessionhost servers to existing/new Hostpool.

.DESCRIPTION
This script add sessionhost servers to existing/new Hostpool
The supported Operating Systems Windows Server 2016.

.ROLE
Readers

#>
param(
    [Parameter(Mandatory = $true)]
    [string]$AzTenantID,
    [Parameter(mandatory = $true)]
    [string]$HostPoolName,
    [Parameter(mandatory = $true)]
    [string]$ResourceGroupName,
    [Parameter(mandatory = $true)]
    [string]$AppID,
    [Parameter(mandatory = $true)]
    [string]$AppSecret
)

$ScriptPath = [system.io.path]::GetDirectoryName($PSCommandPath)

# Dot sourcing Functions.ps1 file
. (Join-Path $ScriptPath "Functions.ps1")

# Setting ErrorActionPreference to stop script execution when error occurs
$ErrorActionPreference = "Stop"

Write-Log -Message "Identifying if this VM is Build >= 1809"
$rdshIs1809OrLaterBool = Is1809OrLater

Write-Log -Message "Creating a folder inside rdsh vm for extracting deployagent zip file"
$DeployAgentLocation = "C:\DeployAgent"
ExtractDeploymentAgentZipFile -ScriptPath $ScriptPath -DeployAgentLocation $DeployAgentLocation

Write-Log -Message "Changing current folder to Deployagent folder: $DeployAgentLocation"
Set-Location "$DeployAgentLocation"

# Checking if RDInfragent is registered or not in rdsh vm
$CheckRegistry = Get-ItemProperty -Path "Registry::HKEY_LOCAL_MACHINE\SOFTWARE\Microsoft\RDInfraAgent" -ErrorAction SilentlyContinue

Write-Log -Message "Checking whether VM was Registered with RDInfraAgent"

if ($CheckRegistry)
{
    Write-Log -Message "VM was already registered with RDInfraAgent, script execution was stopped"
}
else
{
    Write-Log -Message "VM not registered with RDInfraAgent, script execution will continue"


    # Get Hostpool Registration Token
    Write-Log -Message "Checking for existing registration token"
    #Install Pre-Req modules
    Install-packageProvider -Name NuGet -MinimumVErsion 2.8.5.201 -force
    Install-Module -Name Az.DesktopVirtualization -AllowClobber -Force
    Install-Module -Name Az.Accounts -AllowClobber -Force
    Install-Module -Name Az.Resources -AllowClobber -Force
    Import-Module -Name Az.DesktopVirtualization

    #Create credential object to connect to Azure
    $Creds= New-Object System.Management.Automation.PSCredential($AppID, (ConvertTo-SecureString $AppSecret -AsPlainText -Force))

    Connect-AzAccount -ServicePrincipal -Credential $Creds -TenantID $AzTenantID

    $Registered = Get-AzWvdRegistrationInfo -ResourceGroupName "$resourceGroupName" -HostPoolName $HostPoolName
    if (-not(-Not $Registered.Token)){
        $registrationTokenValidFor = (NEW-TIMESPAN -Start (get-date) -End $Registered.ExpirationTime | select-object Days,Hours,Minutes,Seconds)
        Write-Log -Message "Registration Token found."
        Write-Log -Message $registrationTokenValidFor
    }


    if ((-Not $Registered.Token) -or ($Registered.ExpirationTime -le (get-date)))
    {
        Write-Log -Message "Valid Registration Token not found. Generating new token with 8 hours expiration"
        $Registered = New-AzWvdRegistrationInfo -ResourceGroupName $resourceGroupName -HostPoolName $HostPoolName -ExpirationTime (Get-Date).AddHours(8) -ErrorAction SilentlyContinue
    }

    $RegistrationInfoToken = $Registered.Token

    # Executing DeployAgent psl file in rdsh vm and add to hostpool
    Write-Log "AgentInstaller is $DeployAgentLocation\RDAgentBootLoaderInstall, InfraInstaller is $DeployAgentLocation\RDInfraAgentInstall, SxS is $DeployAgentLocation\RDInfraSxSStackInstall"
    $DAgentInstall = .\DeployAgent.ps1 -AgentBootServiceInstallerFolder "$DeployAgentLocation\RDAgentBootLoaderInstall" `
                                       -AgentInstallerFolder "$DeployAgentLocation\RDInfraAgentInstall" `
                                       -SxSStackInstallerFolder "$DeployAgentLocation\RDInfraSxSStackInstall" `
                                       -EnableSxSStackScriptFolder "$DeployAgentLocation\EnableSxSStackScript" `
                                       -RegistrationToken $RegistrationInfoToken `
                                       -StartAgent $true `
                                       -rdshIs1809OrLater $rdshIs1809OrLaterBool

    Write-Log -Message "DeployAgent Script was successfully executed and RDAgentBootLoader,RDAgent,StackSxS installed inside VM for existing hostpool: $HostPoolName`n$DAgentInstall"
}
Compiling BICEP
I trigger my deployment from Azure Dev Ops using an ARM Template Deployment. Therefore, I need to build the BICEP files into the required JSON ARM template.
This is incredibly simple with the BICEP command line tool.
Open a CMD Prompt (or PowerShell) and navigate to the directory with the BICEP files in. Then run:
bicep build <name of main bicep file>

bicep build .\MainBuild.bicep
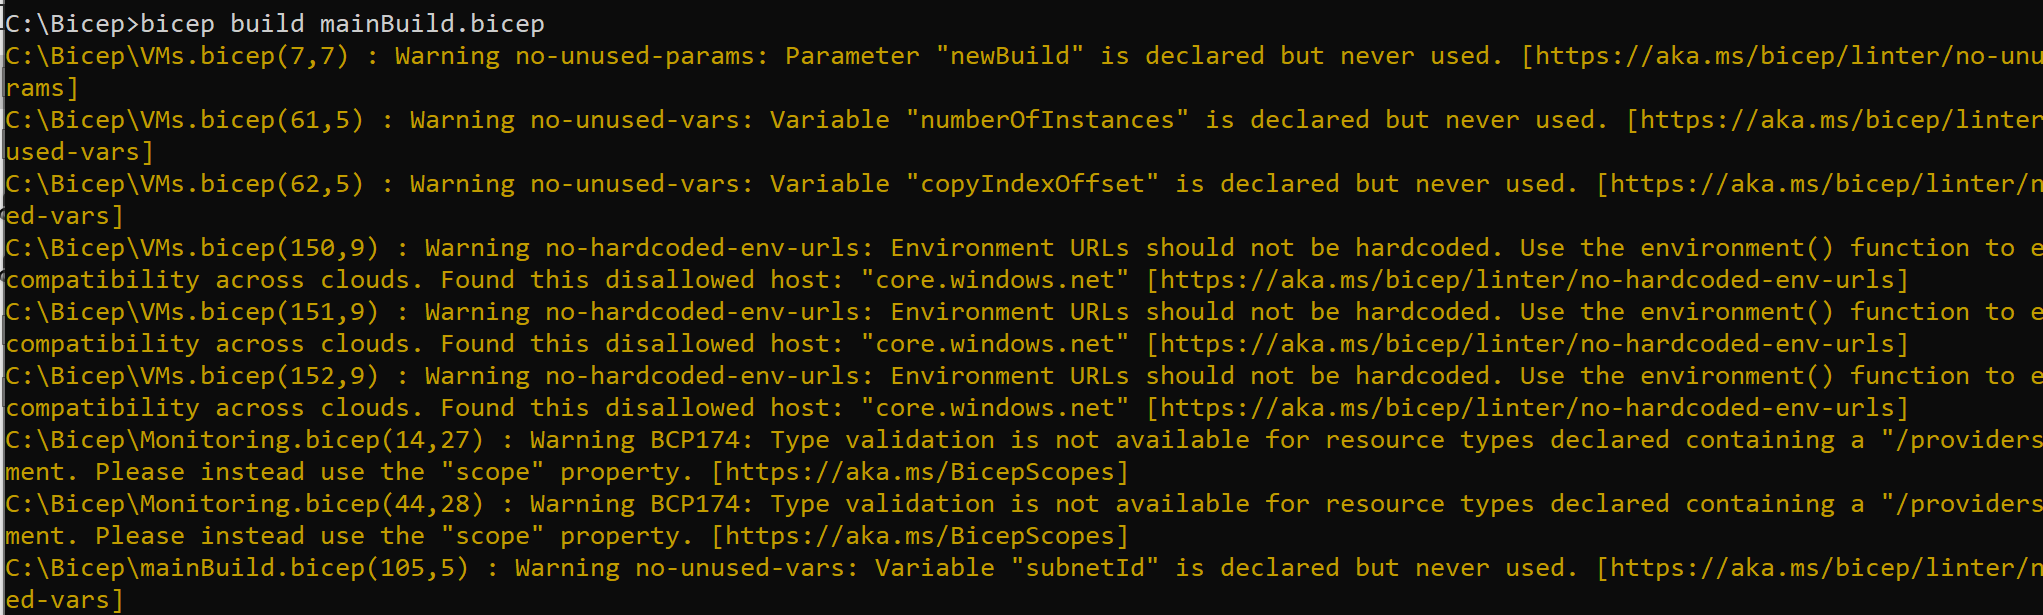
In my case, there are a few warnings but these can be ignored.
In the newest BICEP scripts, these warnings have been fixed and there should be no warnings or errors when converting.
This will have generated the MainBuild.json file, which can now be used to deploy your environment.
I then use this JSON file in my Azure Dev Ops deployment.
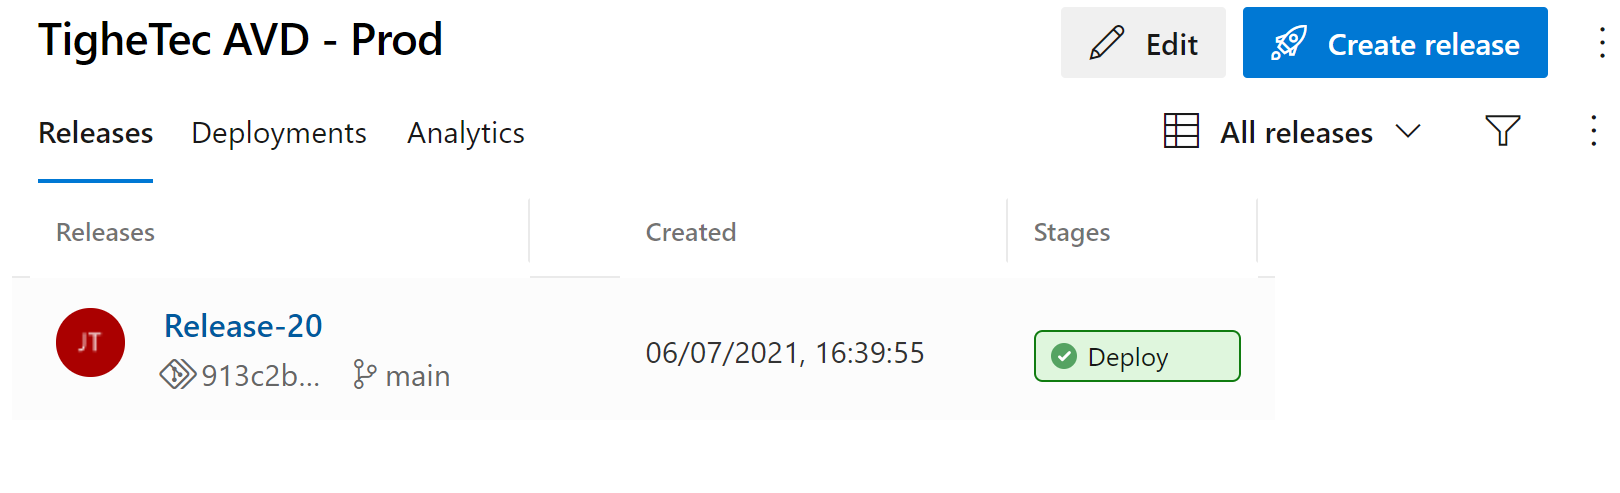
Once deployed I have a fully functioning AVD environment
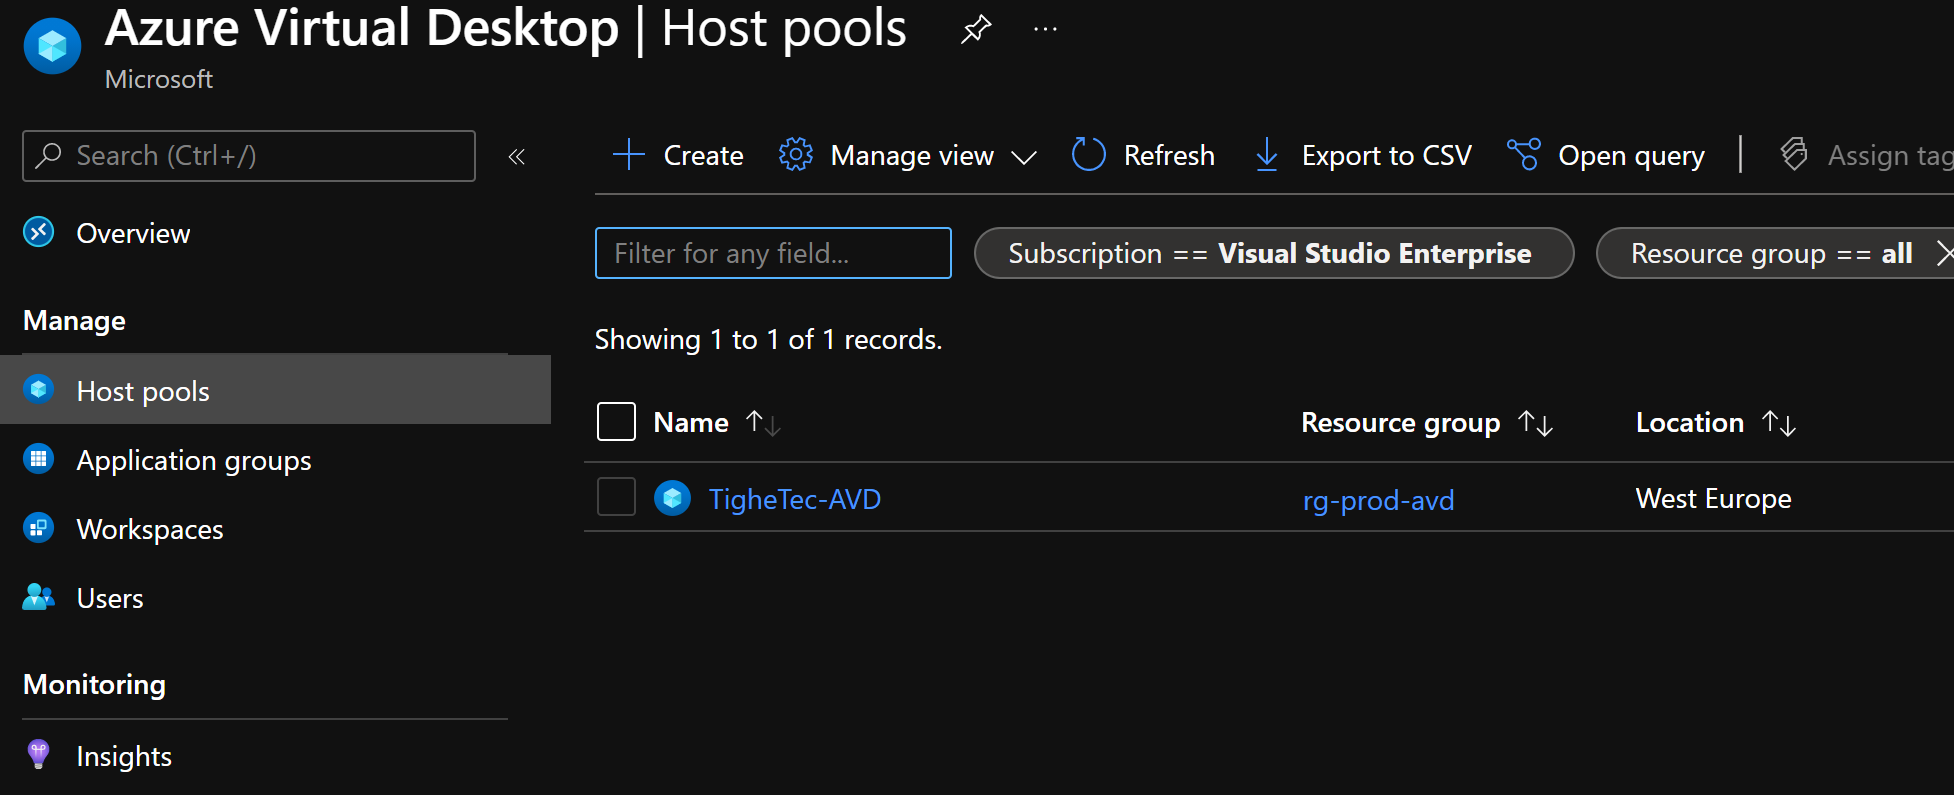

Conclusion
So there we have it. A full AVD deployment from BICEP code. The exact specifications of the build can be changed simply with the Parameters.
There are a few changes I will make to this deployment but authoring this gave me a good understanding of the BICEP language and how it can be used to streamline deployment templates.
Being able to edit the BICEP files separately is far easier than trawling through an incredibly complex JSON file.
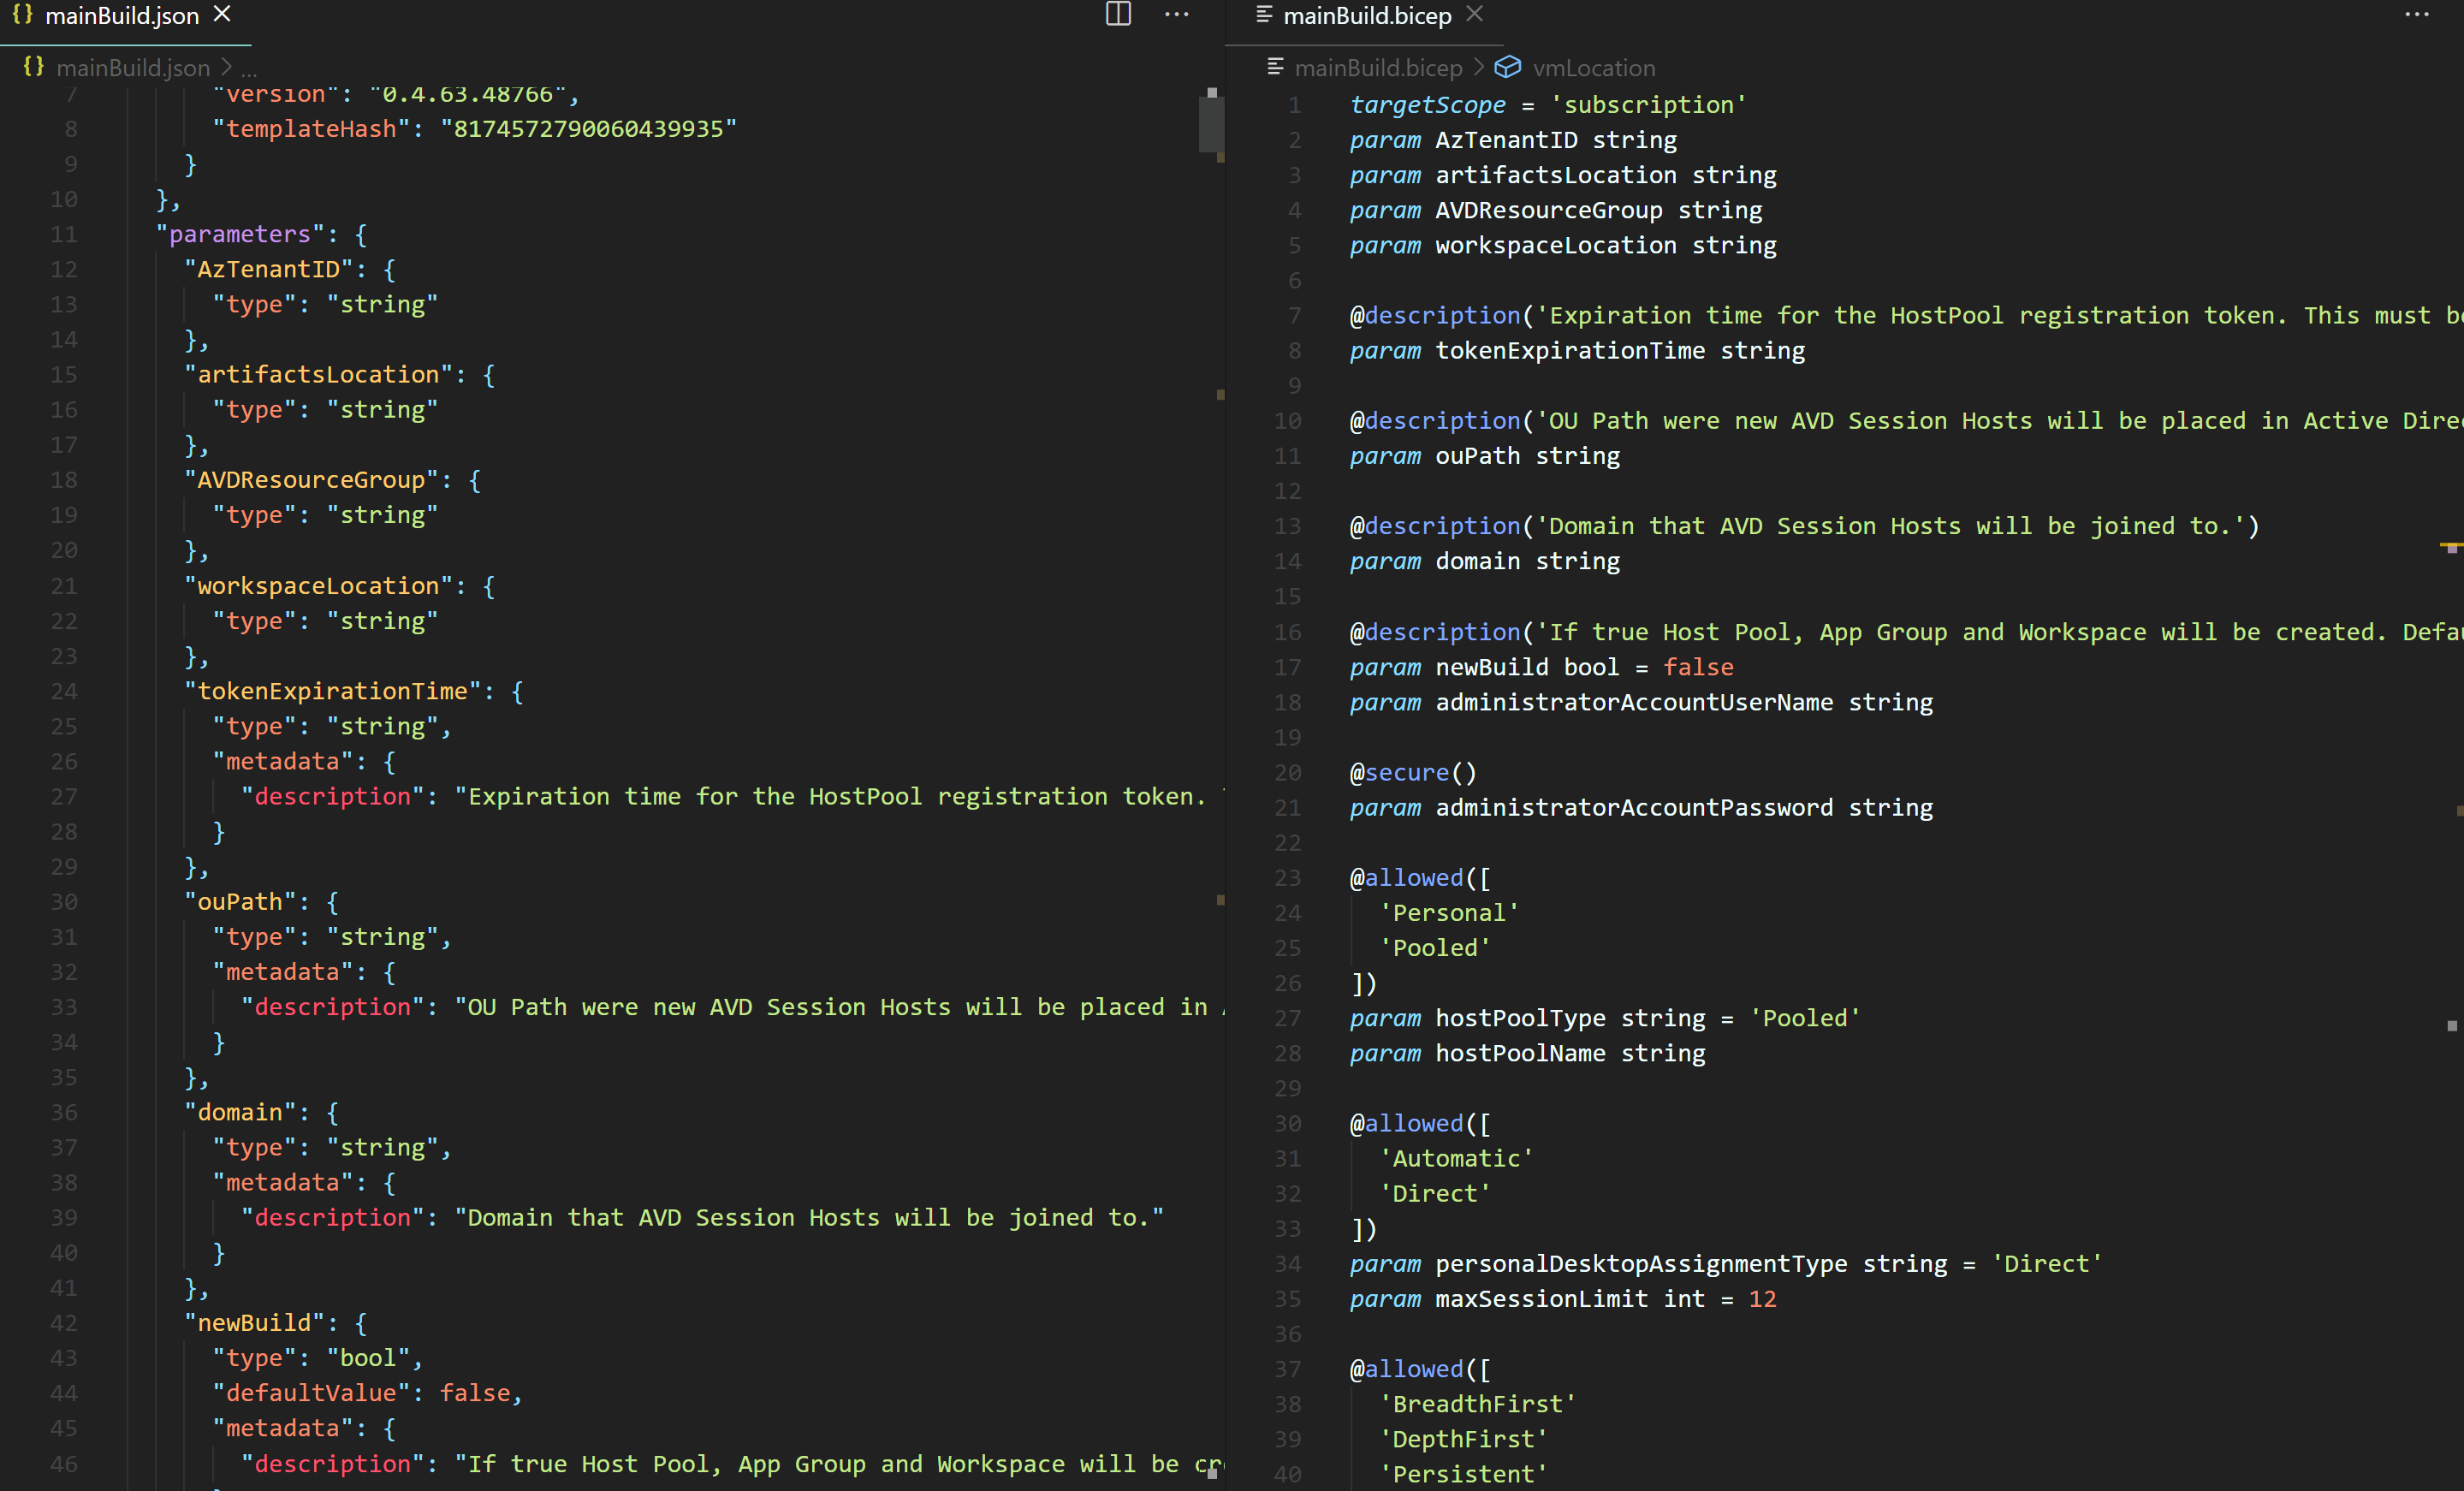
The clean nature of the code is great, as now I don’t have to worry about the brackets and formatting of a standard JSON file. Just compare the parameters section below:
I will definitely be looking to use BICEP for my template authoring from now on and can’t wait to see how it evolves as a DSL.

Seems to fail because there is no resourceGroup.bicep file in the repo?
LikeLike
you would indeed be correct. Missed that file out my bad.
Added it to the repository now 🙂
LikeLike
Thanks for taking the time to document and share all this!! Great work, keep it coming!
LikeLike
Really great job! This has helped us alot.
Is it just us, or is there an issue with Script-RenameDesktop.ps1 and Script-AddDefaultUsers.ps1 not being ran? “SessionDesktop” is not being renamed, and no users gets assigned.
Cheers
LikeLike
Actually I noticed a problem with this recently. It was working but think there is a new issue with the DSC tasks.
On one of the hosts I noticed a weird error when running the New-AZADRoleAssignment script.
I’m looking into it nowz
LikeLike
Did you have time to figure out the issue?
LikeLike
Yes I believe so. I am just testing it now. I believe it’s the permissions on the Service Principal over the subscription.
It oddly works in one of my environments but not the other. So comparing the permissions.
I
LikeLike
Sorted it now it was permissions for Role Assignment.
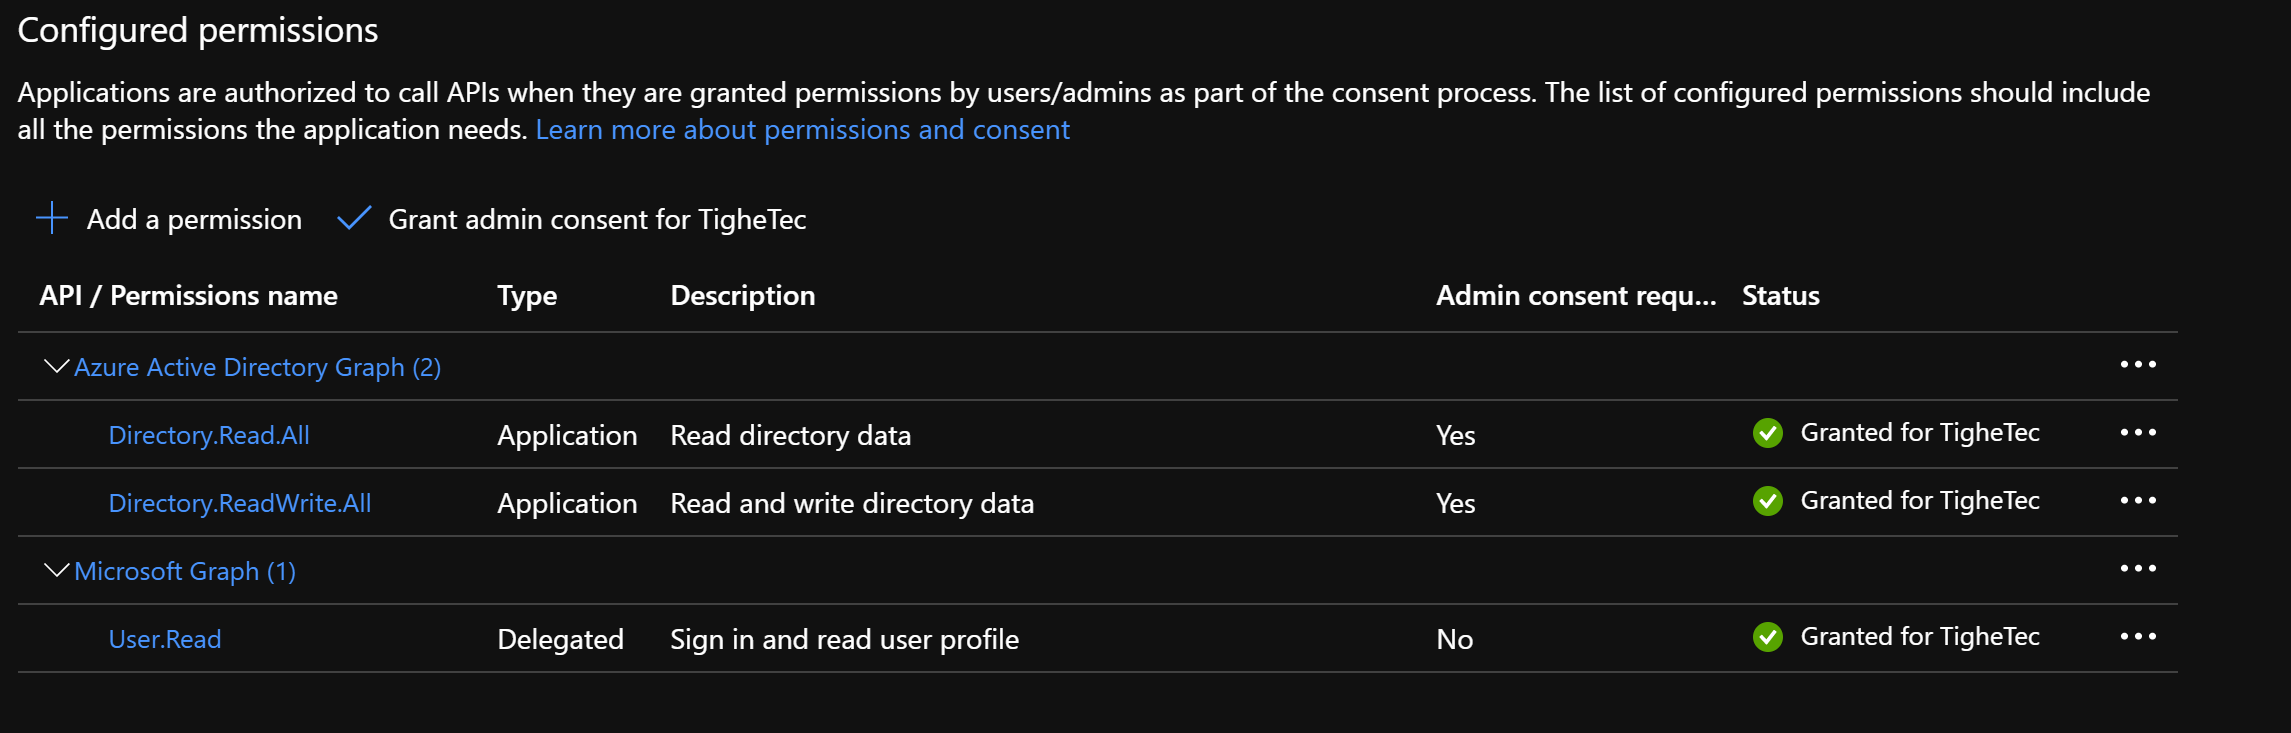
In order for the Azure Role Assignment in the DSC script to run, the Service Principal needed some extra Graph API permissions.
Specifically the 2 permissions below:
Directory.Read.All
Directory.ReadWrite.All
as Application (not Delegated)
I completely forgot to re-add when I changed my Service Principal.
The Service Principal has owner permissions over the subscription and then those Graph API permissions. I have just retested and default users assigned without issue.
LikeLiked by 1 person
I like this – good work. I’m not sure why you would do the app group rename and assignment of users from DSC though? It will run multiple times and is complicated this way. Just run it at the end of backplane. You can configure these before you deploy the session hosts – and you don’t need to mess around with service principles, etc. 💪🏾
LikeLike
Basically I wanted to be able to run the whole deployment from DevOps without any need for the Azure Portal.
The logic in the DSC config will only run the rename and add users on the first host in the deployment based on the session host name being “-0”
However, I didn’t think that I could set this in the backplane part and that’s why I went the DSC route.
I’ll definitely have a look at that though.
We use this in our production AVD for deployments so any improvements are welcome 😄
LikeLike
Awesome. We are working on something similar and yours was very helpful, so will let you know too, but this is the way I did it in PowerShell and ARM previously 👍🏼
LikeLike
Hi James,
good work!
I’m having some difficulties in understanding the purpose of the parameter “applicationGroupReferences” in case of a new build. Any tips/description for this parameter?
LikeLike
Hi Mike,
This was basically to allow me to deploy to an existing Workspace.
By standard, the JSON in the ARM template to create the Workspace will update the application group reference, which will clear out existing application groups, and only include the newly deployed Desktop Application Group.
Using the “applicationGroupReferences” you can put a list of existing application groups in to make sure that the deployment doesn’t remove them.
You do this in the form of the ResourceID of the application group from Azure.
/subscriptions//resourceGroups/rg-prod-avd/providers/Microsoft.DesktopVirtualization/applicationgroups/TigheTec AVD-DAG
You only need to bother with this if your workspace holds multiple host pools and application groups. In my case, the Workspace contains only 1 Host Pool with a single Desktop Application Pool so I don’t use this often.
Hopefully, this makes sense.
James
LikeLike
Hi James,
Thanks for these blog posts – very helpful in understanding Bicep structure.
I’m running into the following error – any advice?
“VM has reported a failure when processing extension ‘dscextension’.
Error message: “The DSC Extension received an incorrect input: A parameter cannot be found that matches parameter name ‘SubscriptionId’. Another common error is to specify parameters of type PSCredential without an explicit type. Please be sure to use a typed parameter in DSC Configuration, for example: configuration Example {param([PSCredential] $UserAccount)}.Please correct the input and retry executing the extension.”More information on troubleshooting is available at https://aka.ms/VMExtensionDSCWindowsTroubleshoot “
LikeLike
Hi Joshua,
Sorry just seen this.
It looks like you are trying to pass a parameter called SubcriptionId to the DSC config part of the build. I’ve checked and the DSC config shouldn’t require that.
What does the DSC section of you BICEP look like? And I take it you are using my Configuration.zip as the source artifact?
It should look something like this
resource dscextension ‘Microsoft.Compute/virtualMachines/extensions@2020-12-01’ = [for i in range(0, AVDnumberOfInstances): {
name: ‘${vmPrefix}-${i + currentInstances}/dscextension’
location: location
properties: {
publisher: ‘Microsoft.Powershell’
type: ‘DSC’
typeHandlerVersion: ‘2.73’
autoUpgradeMinorVersion: true
settings: {
modulesUrl: ‘${artifactsLocation}Configuration.zip’
configurationFunction: ‘Configuration.ps1\\AddSessionHost’
properties: {
HostPoolName: hostPoolName
ResourceGroup: resourceGroupName
ApplicationGroupName: appGroupName
DesktopName: desktopName
AzTenantID: AzTenantID
AppID: appID
AppSecret: appSecret
DefaultUsers: defaultUsers
vmPrefix: vmPrefix
}
}
}
James
LikeLike
Hi James,
thanks a lot for these scripts, they helped to understand bicep very much. I am already done but the last step is still having issues. I got the same error as Joshua with the missing “SubscriptionId”. My code looks exactly as it should look like. In the end all ressources are created but the VMs arent assigned to the hostpool. I removed the extensions fpr language setting and loganalytics but I think this couldnt have an impact.
LikeLike
James! This is great content. We are actually in the middle of revamping our entire datacenter and just got to the AVD part. We too found that Bicep and Azure DevOps was critical to doing this at large scale. If you were up for it we would love to see about getting your help. We are on a crunch trying to get this working and this documentation is amazing. Thank you. Would love to pick your brain on if you have found any newer ways to complete this that still use the same basic principals but Azure is constantly changing how this stuff functions. We would be happy to pay for your time if you would be up for it.
LikeLike
Hi Jon,
So my approach was born out of a need to get a platform up and running but the company didn’t want to pay for extra services (read Nerdio)
I found that this approach is pretty scalable when needed.
Feel free to drop me an email at james@tighetec.co.uk and I’ll be happy to help out.
James
LikeLike
Hi James,
im trying to do something extremely similar to you but i am having trouble. I have an existing AVD host pool, workspace, app group and assignments for an AAD security group called AVD-users. No VMs/session hosts are in there. My idea is to have a trigger that will deploy a session host vm on demand. im not worried about the trigger part right now.
Right now im trying to figure out to create a session host vm to the host pool using bicep. One thing that is different from your deployment is that i am trying to do an Azure AD join of the VM , meaning NOT using the AAD domain services or active directory. Of course i can do the process manually using the azure portal, at the section about ‘domain to Join’, there are 2 option , Active Directory and “Microsoft Entra ID” aka new name for Azure AD, when i select Microsoft Entra ID it works everything deploys and users in the security group can connect to the session host vm.
but i cannot seem to replicate this in bicep! DO you have any advice?
LikeLike
Hi,
My newest build does allow join to Azure AD.
There are some parameters in the new build for AzureAD join not sure which blog post it is in.
I basically added a conditional if in the bicep.
I also added support to add the hosts to intune and use ephemeral disks.
Let me find where it is for you.
James
LikeLike
Have a look at this post https://tighetec.co.uk/2022/07/01/avd-deployment-azure-ad-join-bicep/ were I did the Azure AD join and Intune bits.
I’m going to make another blog soon with some cleaned up code. It’s not in my GitHub yet but I’ll add it soon.
LikeLike
I could not see parameters.json file in the github. Should we directly declare parameters values in the mainbuild and/or individual modules ?
LikeLike
Hi,
The parameter file is the mainbuild.json file.
I would declare in the main a parameter file or as inline parameters.
The modules will take the values from the main parameter file so just declare in there.
LikeLike
so while using via Devops Pipelines ARM deployment task, should i use mainbuild.bicep file and mainbuild.json file as parameters. I should provide the values in the json file right ? The excel dev variables file
you provided was just for reference ?
LikeLike
Yes the Excel sheet was just to explain the parameters when I first made it.
In Dev Ops I use the mainbuild.json as the parameter file and then override with Dev Ops variables from an attached variable group.
LikeLike
Hey James, Just curious have you tested this code with a Win11 image? We have used a variant of this for some time. We attempted to build new Win11 and when we deploy the DSCconfiguration fails. Just curious if you already tried and knew of something that we would need to change.
LikeLike
Hi Jon, it works on my Windows 11 builds. Or did last time I checked. I have 3 Windows 11 Host Pools all built with this DSC.
What error do you get?
LikeLike
Didnt see this part on the DSC guide.
https://learn.microsoft.com/en-us/azure/virtual-machines/extensions/dsc-windows
The DSC Extension supports the following OS’s
Windows Server 2022, Windows Server 2019, Windows Server 2016, Windows Server 2012R2, Windows Server 2012, Windows Server 2008 R2 SP1, Windows Client 7/8.1/10
LikeLike
{“code”:”VMExtensionProvisioningError”,”message”:”VM has reported a failure when processing extension ‘dscextension’ (publisher ‘Microsoft.Powershell’ and type ‘DSC’). Error message: ‘DSC Configuration ‘AddSessionHost’ completed with error(s). Following are the first few: PowerShell DSC resource MSFT_ScriptResource failed to execute Set-TargetResource functionality with error message: Cannot bind argument to parameter ‘SubscriptionId’ because it is an empty string. The SendConfigurationApply function did not succeed.’. More information on troubleshooting is available at https://aka.ms/VMExtensionDSCWindowsTroubleshoot. “}
Im double checking everything now cause now that you say that it seems like I just missed something on the params that may be inacurate. Let me see what I can find.
LikeLike
If you’re using my dsc script you need to parse in a subscriptionid and a couple of other variables.
From memory this is used to check for the host pool exists.
LikeLike
Ya know sometimes you just need to post an error on a public forum to find the answer. I fixed it. My bad. It was an issue with our service principal.
LikeLike
As long as it works! I need to update as made a load of changes to do extra things like trusted launch machines. Need to find time to update it
LikeLike
All working. Just glad thats fixed. The code is great. I cant wait to see the updates. I need to update ours with the new Insights and DCR Rules for AVD. I manually changed a bunch of ours but the new Insights is really good.
Still on the fence with using trusted launch. Seems like there have been a number of limitations with redeploy and or certain features. Definitely want to take a look further at it though.
LikeLike