

This is going to try and be a quick little blog on how to utilise an Azure file share for hosting of the Windows Virtual Desktop FSLogix Profile Containers.
Using Azure File Shares is a great way to provide storage for user profile data within WVD. Azure file shares are relatively cheap to provision and easy to configure.
There are a number of things that need to be understood however.
Azure File Shares will need to Active Directory joined in order to be used for FSLogix Profile Containers (I will walk through this process later)
Another thing to consider is the limitations of the Azure File Shares.
You have the choice between Standard and Premium File Shares. They differ in many ways, especially with regard to IOPS and data transfer per share. Find below the current limits for both types of file share.
| Resource | Standard file shares | Premium file shares |
|---|---|---|
| Minimum size of a file share | No minimum; pay as you go | 100 GiB; provisioned |
| Maximum size of a file share | 100 TiB*, 5 TiB | 100 TiB |
| Maximum size of a file in a file share | 1 TiB | 1 TiB |
| Maximum number of files in a file share | No limit | No limit |
| Maximum IOPS per share | 10,000 IOPS*, 1,000 IOPS | 100,000 IOPS |
| Maximum number of stored access policies per file share | 5 | 5 |
| Target throughput for a single file share | up to 300 MiB/sec*, Up to 60 MiB/sec , | See premium file share ingress and egress values |
| Maximum egress for a single file share | See standard file share target throughput | Up to 6,204 MiB/s |
| Maximum ingress for a single file share | See standard file share target throughput | Up to 4,136 MiB/s |
| Maximum open handles per file or directory | 2,000 open handles | 2,000 open handles |
| Maximum number of share snapshots | 200 share snapshots | 200 share snapshots |
| Maximum object (directories and files) name length | 2,048 characters | 2,048 characters |
| Maximum pathname component (in the path \A\B\C\D, each letter is a component) | 255 characters | 255 characters |
For my purpose I am only running a development environment so I am happy to use a Standard File Share as the IOPS and transfer rate are not particularly important.
Creating an Azure file share
I am going to assume you already have a suitable Azure Storage Account available to host the File Share. If not quickly go configure one and I will wait. . .
We need to create a new File share withing the relevant Storage Account. I will create a share named wvdprofiles with a 200GB quota as below:

We next need to assign some particular Azure Role Assignments to the File Share. Click into the new share and then select Access Control (IAM)
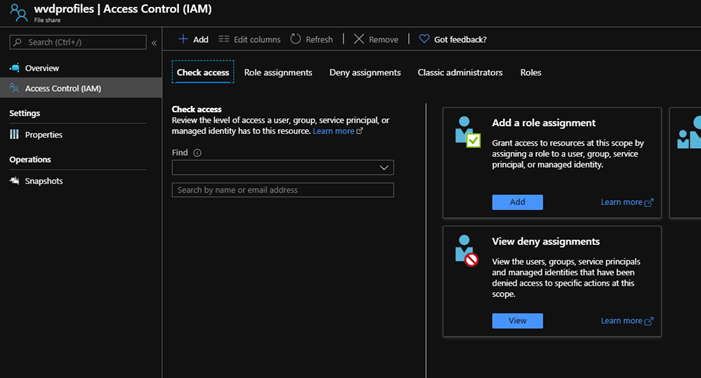
Click Role assignments

Next click + Add and then select Add role assignment

We need to add the relevant AD Group (or users if testing) with the Storage File Data SMB Share Contributor role assignment.

You can use the Storage File Data SMB Share Elevated Contributor if specific users require admin level access (to set permissions etc)
Join Storage Account to Active Directory
In order to allow the use of the relevant NTFS permissions required for WVD, we need to domain join the Storage Account.
This process is relatively straight forward and uses AzFilesHybrid PowerShell module. This module will need to be downloaded from:
https://github.com/Azure-Samples/azure-files-samples/releases
First, download the newest version of the module from the above GitHub repository to a suitable folder on any domain joined machine.
In order to domain join a Storage Account you must be logged into a domain joined machine, with an account that has relevant permissions to join devices to the domain.
Once the module has been downloaded and unzipped, we will need to run the following script.
.\CopyToPSPath.ps1
Import-Module -Name AzFilesHybrid
#Login to Azure using a suitable admin account
Connect-AzAccount
#List Azure Subscriptions
Get-AzSubscription
#Select relevant subscription
Get-AzSubscription -SubscriptionName "<Subscription Name>" | Select-AzSubscription
Join-AzStorageAccount -ResourceGroupName "<Resource Group Name>" -Name "<Storage Account Name>" -DomainAccountType "<Computer|ServiceLogonAccount>"
You may be prompted to update or install the Az and Az.Storage modules. Please allow this if asked.
After successful completion of the command you should see something similar to the below:

The Storage Account should now be successfully joined to Active Directory. To check this we can look under the Configuration options for the Storage Account. You should see the domain under Joined domain.

Setting File Share Permissions
We now have to make sure we add the relevant permissions to allow the required WVD users to connect to and access the File Share.
The recommended permissions for the File Share are as below:
| Account | Scope | Permission |
| Storage Account Users | This Folder Only | Modify |
| Creator/Owner | Subfolders and Files Only | Modify |
| Storage Account Admins | This Folder, Subfolders, and Files | Full Control |
With regards the Storage Account Users and Storage Account Admins, these are the groups found locally on the Storage Account. These groups correspond the role assignments we added earlier.
| Storage Account Users | Storage File Data SMB Share Contributor |
| Storage Account Admins | Storage File Data SMB Share Elevated Contributor |
To set these rights we need to login to a domain joined machine and mount the Storage Account. We can then set the permissions as needed.
Open up Command Prompt on a domain joined machine, and run the following:
net use Z: \\<storageaccountEndPointURL>\ShareName <Storage Account Key> /User:Azure\<StorageAccountName>Now open File Explorer and you should see the Storage Account mapped as the required drive letter (in my case Z:)

Right-click and select Properties.
Then select the Security tab and then click Advanced
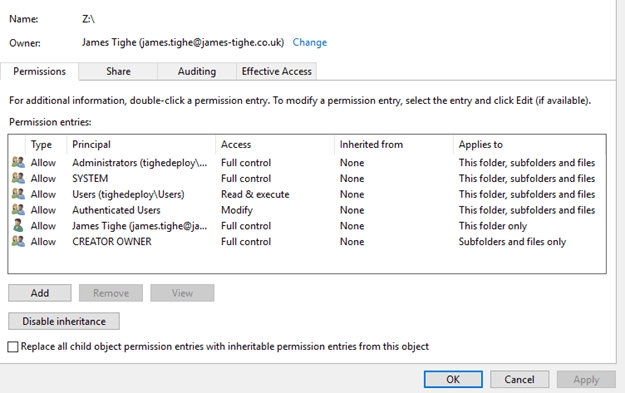
We now need to make sure the permissions are set as per the previous table. Therefore, we now need to remove the unneeded permissions and ensure the Storage Account permission are set correctly.
A completed example is below:

Note that the User group had Modify Access with Applies to set to This folder only.
As advised Users will correspond to any AD account granted the Storage File Data SMB Share Contributor role.
Admins will correspond to any AD account granted the Storage File Data SMB Share Elevated Contributor role.
Setting the permissions this way means we need only grant users the required Azure Role Definition to allow access for FSLogix Profile containers.
FSLogix Setup
We now need to do a little setup to configure FSLogix on the machine to use the new File Share.
Download the FSLogix Installer from the following link:
Run the FSLogixAppsSetup executable file.

Agree to the terms and conditions and Install
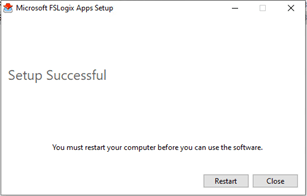
If you are prompted to reboot do so.
We now need to set the relevant settings to allow the user of the FSLogix Profile Containers on the machine. To do this I will to add the settings via the Registry.
You can add the settings via Group Policy but in my deployment I like to have certain settings hard baked into the master image.
Open REGEDIT
Navigate to HKEY_LOCAL_MACHINE\SOFTWARE\FSLogix\Profiles
Then add the relevant keys as below. The VHD location will need to be set to the required entry.
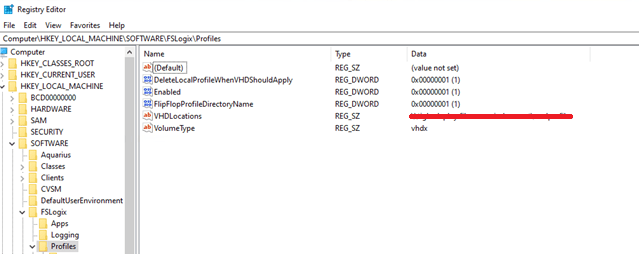
The above registry keys are as below.
DeleteLocalProfileWhenVHDShouldApply: This setting simply removes the existing profile if the user should have a VHD applies. Be careful using this if there is already user data in profiles. Ideally set this in the image.
Enabled: Enables the FSLogix Profile Container
FlipFlopProfileDirectoryName: Save the Profile Container disk with the format <username-SID> to enable easier sorting. Default is <SID-Username>
VHDLocations: UNC path to the Azure Storage Account File Share
VolumeType: Sets to either VHD or VHDX. Recommended to set to VHDX.
Once these settings have been configured the machine will be setup to utilize FSLogix Profile Containers.
Testing
Now we can do a little testing to see the FSLogix profile container in action!
So, attempt to login to the Host Pool via either the Web Access or the Remote Desktop Client.
When logging in you should see Please wait for the FSLogix Apps Services this is a good sign!

Once logged we can check the Storage Account, and we should see the presence of a new Profile Container for this user.
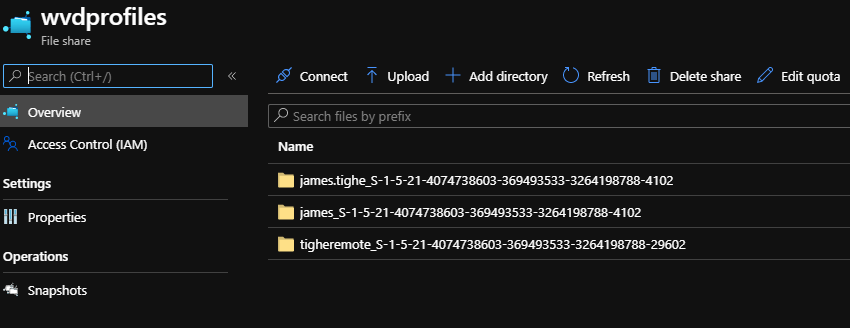
As you can see my user account has a relevant Profile Container, specified in the <username>_<sid> format!
You can also check the FSLogix log on the machine to see that the container has mounted.
Go to C:\ProgramData\FSLogix\Logs\Profile and open the latest log file.

The log file is pretty large but we are just interested in checking that the container mounted. Therefore, search for VHD attached and hopefully you should see something like the following:

Incidentally if for any reason the container did not mount, you should see the error here to help you investigate.
So there we have it. How to easily setup FSLogix Profile Containers on an Azure File Share. Enjoy!
